How-to make a QR code out of web pages using Google’s Chrome browser

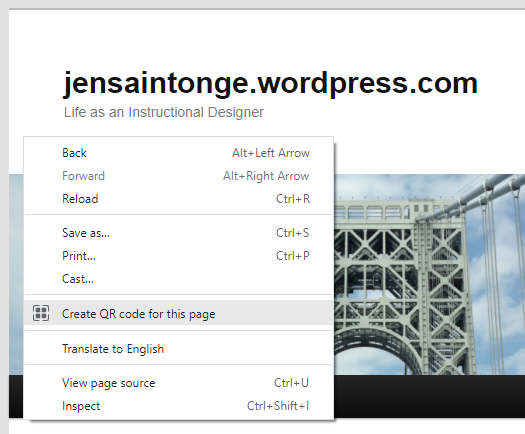
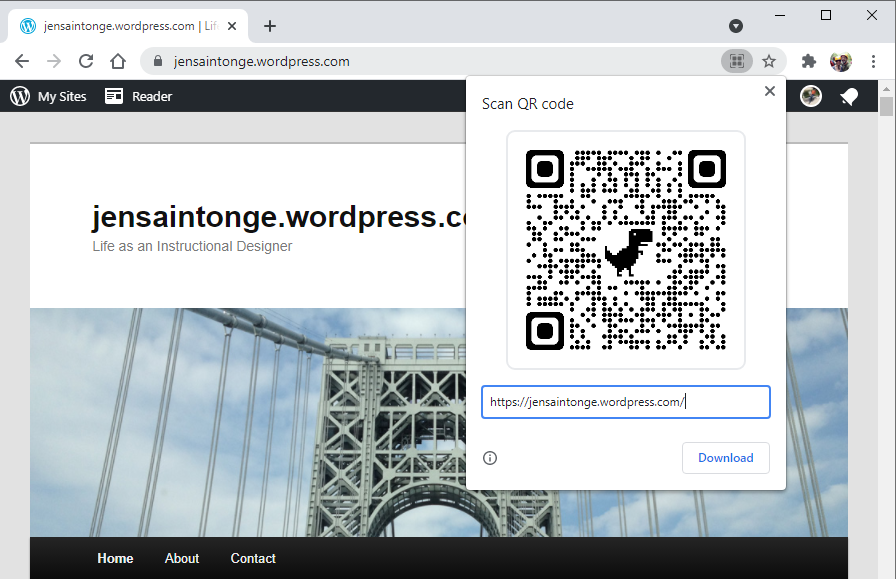
This is one of my favorite newly-found tools: creating a QR code out of any page. I found it one day from the right-click menu. My husband asked me to pull up the inspector on some page, and there it was. Create QR code for this page. It’s a fast, lazy way to send web content to my phone.

Here’s how to do it.

  1. Using Google Chrome browser, go to the page you want the QR for
  2. Right-click anywhere on the page’s background
  3. Click “Create QR code for this page” from the menu

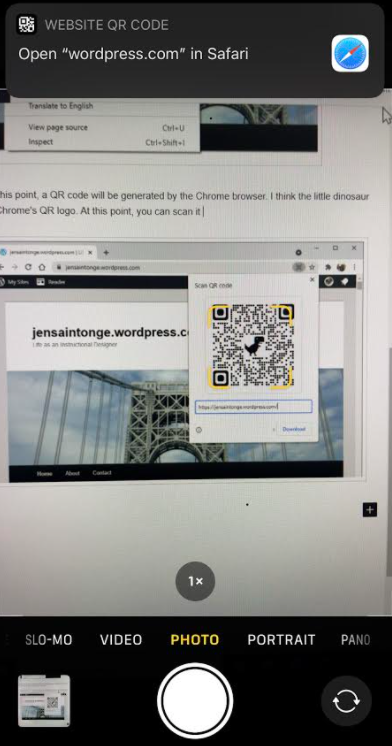
At this point, a QR code will be generated by the Chrome browser. I think the little dinosaur is Chrome’s QR logo. At this point, you can scan it from your phone. Note that on the address bar of Chrome, there is now a QR code button on the right side you can click on. This button appears when you put your cursor in the address bar.

Test out my QR code above by sending my blog to your device.

Below is a screenshot of what it looks like when I pull up the QR code using my iPhone’s camera. When I click on ‘Open “wordpress.com” from Safari, it will take me to jensaintonge.wordpress.com.

Fun fact: Hold down the link to page in Safari for a few seconds to see a preview of the page.

Ways I use this (or plan to)

  • Send a YouTube how-to video to myself or my husband, so we can watch steps on a phone while I’m doing something, like a YouTube showing how to pull a part on a car
  • Quickly send a Webex Invite page to my phone so I can log in from there
  • Share a link to a group of people in an in-person meeting from a projector

Feel free to comment below… how can you see yourself using QR codes? I love hearing new ideas!

Lookouts

  • This works best from desktop and laptop machines. You can create QR codes from your phone, but there are other sharing options that may be just as fast. Or not, you never know!
  • If you send someone a page that requires a login, you still need to log in to access it.
  • You won’t have the option to create a QR code from blank addresses or Chrome settings pages (which you don’t really need anyways…).
  • Always make sure you know where your QR codes are coming from. They can direct you to nefarious things if you aren’t careful.
  • If you don’t want the dinosaur, you can use Adobe Illustrator to create your own QR code without the logo.

That’s it! It is incredibly easy to create and use QR codes. I hope this helps someone out in the clouds!

Customer Training versus Customer Experience

What your customers ask you says a lot about what your training tells them.

From a recent Insider, I read a post called You Don’t Understand Your Users, (by Justin Etheredge, November 6, 2020). It’s a 5-7 minute read. I relate to this article, because I help develop training where my experts are software developers, electrical engineers, project managers, even a few former nuclear submarine operators. Oh, and I don’t have or plan to have a watch of any kind.

I love working with motivated people doing interesting work. Have you ever heard someone answer a yes or no question using calculus with unfaked excitement in their voice? I have. It’s beautiful and terrible. But sometimes, it can be a warning flag that they may not be applying a relatable perspective for our participants or operators.

The other day, I had a subject matter expert tell me that I needed to make our training longer, because users kept putting data in the wrong place. Something didn’t add up, though. I set up a recorded interview and asked the person to walk me through the steps using a real example. But first, I asked my SME to imagine that they worked for a customer, and their boss asks them to get this form completed before they leave work, five minutes before the end of the day… and imagine they had happy hour plans.

The reply? The architect, the expert, the instructor said: “I’ve never actually used the software before. I have never tried to fill out the form.” It turns out, users weren’t filling in the correct field because of a typo on the form. Rather than training, it required a tiny improvement to the interface. Meanwhile, now we have all kinds of over-explanation of one field that feels a little clunky in training. More importantly, our interview after that went great, with many mentions of how to get to happy hour on time.

If only every situation were that simple to fix, right?

With that said, it’s a little awkward to have someone assume I’m a technophobe because I’m not glued to my phone. It’s equally awkward when someone asks me to teach them about their smartphone* and somehow VBA and iOS apps are synonymous.

[* My smartphone answer works almost every time: “Try search”.]

It’s not that they don’t care about customers. It’s just that it takes practice to step back from the expert roles that they know so well. So, whether you’re a SME or an instructional designer, remember to pause and reflect on a few things:

  • Customers, employees, and users of all kinds usually just want to complete the tasks they are paid to do. Be understanding when a user does not want to know more.
  • Try to find a relationship (like happy hour) with your audience that most will share, and avoid what most will find to be intimidating (like calculus). Making it emotionally driven (5 minutes before work ends) will help SMEs separate the fluff from the real content.
  • If you feel you need to cover your butt, do not lengthen your content to do it. It will just drown out the most important messages. Instead, use an up-front disclaimer that is not part of your content. Avoid citing lengthy rules or laws in the training. Add it to the end as references.
  • User guides are for users, not for content providers. Build them to solve immediate user issues fast. Carve out a permanent budget to keep them updated.
  • If everyone is making “the same stupid mistake”, it’s most likely either a result of poor training/communication or poor software interface. Or both.

Sure, on the flip side blinders can be frustrating, and we can’t walk people through everything. But if we want our noobs to become proficient at a task or to become knowledgeable of a topic, it starts with patience, good steps, and practice time.

So, if you take away nothing else, remember this: I don’t like watches.

How to Rename a PowerPoint Object without Selection Pane

This is an obscure post, so bear with me. This is really for people who use VBA to write macros and code for PowerPoint and other Office apps that use objects the same way as PowerPoint. This is a way to take advantage of a way that PowerPoint Selection Pane works in arrays or other functions.

I found a really cool thing that I don’t want to forget how it works. Until today, I didn’t realize that Microsoft could rename objects (like text boxes, circles, rectangles, etc) in PowerPoint or other Office apps.

What happened?

So there I was, writing a flowchart in PowerPoint, with my Selection pane open. I had a bunch of rectangles on a page that were my proper steps, but they weren’t all that flow-charty. So I decided to change their shape. With my first rectangle selected, I went to

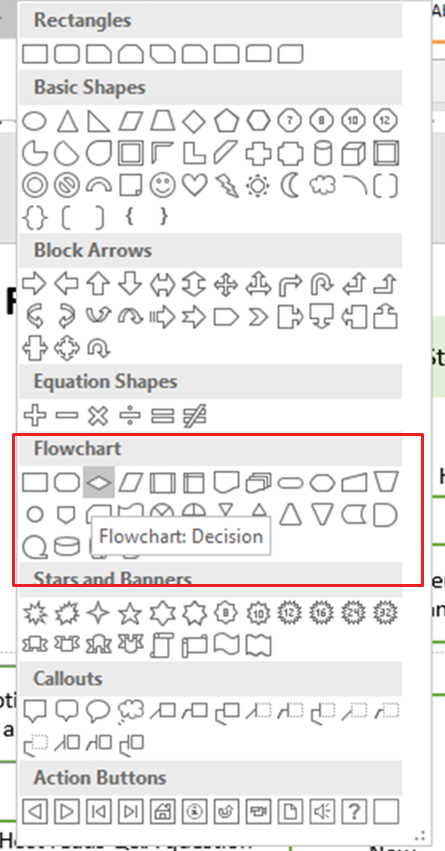
Drawing Tools > Insert Shape Group > Edit Shape > Change Shape > [select a shape]

Lazily (or so I’d thought!), I hadn’t renamed my objects before I’d started animating them. I hovered over each object (see image below, trying to relearn flowcharting by way of the object names.

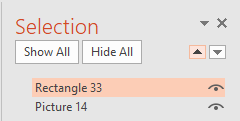
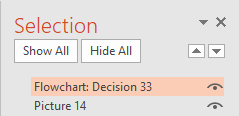
I changed my Rectangle object to a Flowchart: Decision object. And on my Selection Pane, the object name changed from Rectangle 33 to Flowchart: Decision 33.

BIG LOOKOUT: It changes the name of the object. If it changes the name, any VBA or other links to that object will break.

Before
After

I tried the same thing on a Rectangle object I’d renamed to chatPanel, and nothing happened when I changed the object type. I then tried to change 33 to a different number, and that also broke the connection.

Why does this matter?

A few wonderful things clicked in my head when I saw this:

  1. Changing to the proper object gives you a decent starting point for naming in Selection Pane
  2. If you leave the names alone (don’t rename it in Selection Pane), it will let you manipulate more objects by code easier. I can see reasons for doing both.

For example, let’s say that I went back and changed all of my Rectangle objects with Flowchart: Process objects, which are just rectangles anyways. I change the shape object to the actual Action Button: Forward or Next, which changes the name in the selection panel from Rectangle 7 to Flowchart: Process 7.

On the surface, it does nothing.

Later, I want to change the formatting to all of my flowchart objects. Or, I want to animate them in. Or I want to make an interactive quiz in VBA. This would allow me to write a function instead of inline code, so I can write a conditional statement if it’s a flowchart: object, call doSomethingToMyFlowchartObjects.

I won’t lie – I just found this functionality and am not sure how to use it. I don’t know the ins and outs. But… I do love writing macros and making things more efficient. I hope to share a real-life use case for it soon! In the meantime, write one in the comments if you’ve got one.

Cheers!

Webex Focus: Try Alt+tab if Webex does not respond to your mouse

“It’s the focus issue again.”

This statement will send cold chills down anyone’s back who’s in the know. It’s a hard thing to describe, even to the best IT people you can find, because sometimes it almost makes no sense. Sometime in June/July the issue seemed to go away, but in a Meeting Center meeting last night where I was the host, that dastardly focus issue came back.

What happened?

So there I was, hosting a Webex. When I clicked “Share Content”, a Webex warning message appeared on my second monitor. I didn’t see it right away and kept trying to interact with Webex on the other screen.

When I saw the warning on my other computer, I tried to click OK, but it wouldn’t let me. The mouse worked, but the mouse wouldn’t appear over the button to click it. “It’s the focus issue again,” I thought I fought down a teensy bit of dread. Fortunately it was just a dry run!

How did I fix it?

  1. I pressed Alt+tab
  2. I pressed Alt+tab again
  3. I was able to click the message, and Webex started responding again

Alt+tab is almost always the solution (and usually doesn’t hurt to try)

Pressing Alt+tab will temporarily take away Webex’s focus and give it back to Windows to control. Then you can simply click on Webex again, and it will reset the focus for you. Just so you know, showing your Desktop and several other things can do the same thing. I’ve found Alt+tab to be the most reliable.

This is what the Alt+tab menu looks like. While holding Alt down, keep pressing the Tab key to select each item on the list.

Holding down the Alt key on your keyboard and pressing the Tab key (i.e., Alt+tab) will bring up a menu of all the things open on your computer. That’s it. You can press it right now, and you will likely see things like Chrome, Outlook, and Excel on the list – or games, and I’m not judging.

If you keep holding down the Alt key and press the Tab key over and over, you will see it highlight different things open. By releasing the keys, it will bring the new window to “focus”.

Even cooler (to me), you can press Ctrl+Alt+Tab once, and that sticks the menu to the screen, so you can use the mouse to click on something, or the your keyboard arrows and Enter key.

How does this help?

The Alt+tab trick simply takes away Webex’s control briefly. It has been a built-in function of Microsoft Windows since before ’95. It’s quite handy, and if you like having 5000 things open at once like me, it’s great to flip through open windows without taking my hands off the keyboard.

Alt+tab also fixes when a warning message gets stuck underneath the Webex window and you can’t click it because Webex gave Webex the focus and forgot the message. Alt+tab in techie ways will remind Webex that there are actually more than one window to think about. Goofy? Yes. Shouldn’t happen? Correct. Be prepared regardless? Absolutely!

If you can think of other ways to take away Webex control briefly, those will likely also work. Feel free to share them in the comments – I love knowing multiple ways to fix things in a pinch!

Alt+tab is a fast fix

The reason I like Alt+tab is because it almost always works, and if it does, it will happen instantly. This happened to a colleague at the beginning of a virtual class we host, and I was able to verbally communicate to her how to Alt+tab out of the issue, and she was back in action within 10 seconds (I should be working on a pit crew). It’s been a funny joke ever since, but on the day it happened it was terrible!

Lookouts to be aware of

The number one lookout for using Alt+tab is the potential to share unwanted materials with Webex attendees. There are a couple ways to do this accidentally.

If you are sharing your screen, Webex attendees will be able to see the Alt+tab menu. They will be able to see a thumbnail view of everything you have open. Make sure those thumbnails are PG and on-task!

If you Alt+tab to something (think Outlook or Gmail) that is already open, it will be brought to the forefront, and your attendees will be able to see it.

You can hit the Escape key to make the Alt+tab window disappear.

References

Help! People in my Webex Meeting can’t hear the sound from my shared content!

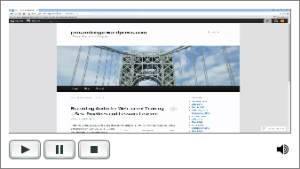
Recently I found this great option for showing streaming video in a Webex meeting. Basically, as the presenter, you can share a streaming YouTube or Vimeo video, and your attendees can hear the audio from the video you are showing. You can see the great little Cisco video here on how to use it (it’s less than 2 minutes):  https://www.youtube.com/watch?v=XN3Z96oEvQA

The problem was that nobody in the meeting could hear the audio from my video when I played it.

Lookout #1: Make sure the feature is turned on. In my case, my company’s Webex account is large enough to be administered by IT, so the button was simply not there because the feature was turned off. There a couple administrative settings they may need to set for you (deep within Webex) to get all the video options working properly. I am going to check with IT to see what they had to do so I can comment on it.

But, even after IT found and turned on the settings we needed to get up an running, I still couldn’t find the button. I couldn’t find the Webex setting to play the audio from my computer anywhere! Where did I go wrong?

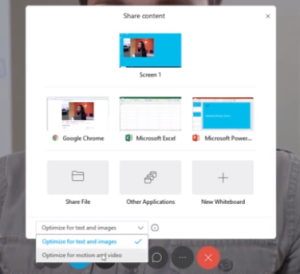
Before changing setting to optimize for motion and video

Before changing the Optimize setting, computer audio option is unavailable.

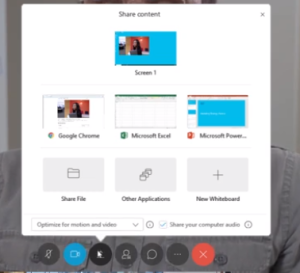
Share your computer audio

Once “Optimize for motion and video” is set, the Share your computer audio option is available.

The answer is embarrassingly simple: I missed a setting that they showed in their video clip (alas). I needed to change my share settings from Optimize for text and images to Optimize for motion and video. Once I changed that setting (shown at 0:22 in the video above), the option to hear my computer’s audio became available.

Steps:

  1. In Webex Meetings, click the Share Content button
    Webex meetings share content button
  2. Find the Optimize dropdown list. In some versions of Webex, it may be at the top of the Share content window, and sometimes it’s at the bottom of the screen
  3. Make sure the Share your computer audio checkbox is selected
    Note: Your mute button does not mute your computer’s audio. Your mic can be live during the video, so if you don’t want to be heard, mute yourself!

There is a problem with this. I’m showing videos that display text-heavy PowerPoint slides, so Optimize for text and images is really the setting I needed to make my slides look beautiful in video form. The resulting video showed very pixelated text. The solution for this was to adjust my second monitor’s resolution down to 1280×720 (using my Windows 10 display settings). This improved the readability of the PowerPoint substantially!

Please let me know if comments if this helps or if you have any questions, and good luck!

Microlearning? We need better data collection and microfixes!

I recently attended the ATD TechKnowledge conference in San Jose, and it was excellent! I love being in a room where I can share my successes and drool over the successes of others at the same time. I stole so many great ideas this year, and I can’t wait to do something with them.

But more on that in the future. First, I want to reflect on a pattern that I’m seeing from others like me across the industry. Sometimes I wonder if it’s why I sometimes don’t get to spend more time on things, like developing microlearning.

We Spend More Time on Administrative Overhead Than on Creative Thinking

Time never seems to be on the side of instructional designers. How many times have you sidelined a project, not because of need, but because there was not enough manpower?

Step back. Why do we need more manpower? Have you ever wished that your department had an administrative assistant – instead of another trainer? Are we addressing the overhead in our areas properly?

What is taking our time away from creative thinking?

Why am I spending 30 minutes to draft each email for a webinar (even when it’s from a template, no less). Why are we still drafting these emails, when the world is screaming, “ENOUGH WITH THE EMAILS, ALREADY!”?

At the #ATDTK, I realized that I’m not alone. Many of us have to set aside dreams of doing the right thing for adult learners in order to complete administrative tasks – like sending an email nobody reads, or running a report that nobody uses. I’ve often wished that we’d hire an assistant before another designer. But that’s selfish of me.

Have you said the same thing?

When I asked around, some ATDTK attendees said they were required to do these tasks – like making a report nobody reads. They’d get in trouble if they didn’t send an email to x, y, and z – and then they have to explain the contents of that email all over again in their next meeting, because nobody read it. But woe to the ID that doesn’t complete these steps. (It’s no wonder we’re really harping on change management these days!)

Let’s assume for the moment that everyone reads our emails, and we should actually be sending them. How much time do you spend each day writing these emails? What if you could take 25% of that time and apply it to the fun, useful, creative thinking projects that we’re hearing about from the adult learning industry? Things that get our learners to the AHA! moment that make us feel so good?

And why do those emails take so long to write? Is it because I agonize over the precisely-perfect wording that I want? Sure, that’s a little bit of it. But the other side of is that in order to write an email that a presentation has been posted online, I need data from SharePoint, from another email I wrote last week, from a Word Document, from… where is the list of internal attendees again? What font should we use again?

Oh, and if you mention that I need data from a Post-It note on someone’s monitor to craft an email, I’m going to cry. Virtual tears will fall, I promise.

There are two uphill battles here. How can I get my data in one place so simple things don’t take forever (and make me want to avoid eye contact with my computer and my coworkers)? Equally important – is there a way I can get that email out without having to hand-craft it each time?

Get Your Data Together!

For once, my overly-analytical brain is helpful! Wanting to automate tasks that I don’t like, I realized that the first thing I needed was a place where things are consistently stored (not a Post-It!!!!). I created an easy place (SharePoint list) where we store all of our training details. I used Microsoft Access to make it a little easier for non-techie folks to update our list. It took a few years for this centralized location to get adopted, and now we’re all using it like champs.

If you do not have a place where your data can be accessed over and over again, like a robot, you should put that on your list of things to do. What comes next will be soooo much cooler if you’re prepared with your data all in one place.

Automate, Automate, Automate

Once we had a central data storage point, I could get to work automating things. Now, once we’ve filled in our intake form (which creates the list record) and add basic training details (title, date, time, SME, etc), we can click a button that will generate a welcome email for our SMEs and a SME approval form for our announcements.

Instead of crafting 2 pages of regurgitated details, my computer does all that crunching for me. I can click another button, and it will make a custom, pre-populated checklist for that training. I have a day-of checklist that we can print with all the day-of details we need to make the event a success (down to the passwords that changed last night).

Our process for administrative work on our webinars has been improved (there’s lots more to go) so that instead of up to 2 days of paperwork before and after a session, it’s 2-3 hours, with the same results. Multiply that by 15-20 webinars per year.

(and I think I can get it to under 2 hours… baby steps!)

I have written before about macros… but then I started having to spend more time on emails and administrative overhead. My pain points have been that these administrative overhead tasks aren’t all that useful to learning (but they look so good on paper!), and they are taking over my job! I am starting to feel more like an Instructional Administrative Assistant than a designer, and I’m tired of focusing on the paperwork that never trained anybody and that nobody wants to read.

So, what I am realizing is that my post about intro macros, which I wrote in 2014, is now ripe for using. You should read it, and dream up new things to do with all the time you can save with macros.
Help! My Captivate Playbar and Closed Captions Disappear in Chrome on Big Monitors!

How to Fix Adobe Captivate’s Disappearing Playbar or Disappearing Closed Captions when in Chrome

TLDR: See the problem and solution below.

Problem: Overlayed Captivate playbars and closed captions disappear in the Chrome browser sometimes. This affects versions of Captivate that publish scalable HTML5 content (it has an unknown impact on other webkit browsers).

Solution:
Use these steps so your closed captions and overlaying your playbar works correctly; otherwise simply uncheck Playbar Overlay in the Skin Editor.

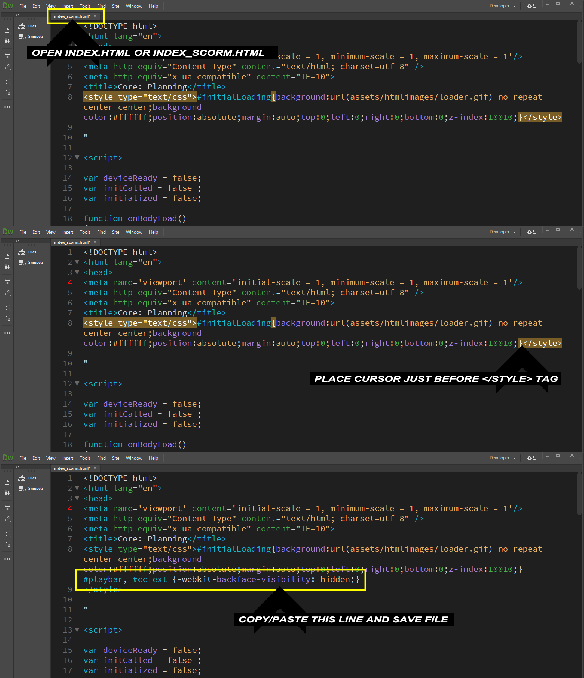
  1. In your published project’s unzipped folder, open index_scorm.html (or index.html if not SCORM) in a text (Notepad) or web (Dreamweaver) editor.
  2. Just before the </STYLE> tag, type the following:
    #playbar, #ccText {-webkit-backface-visibility: hidden;}

    Animated image showing where to add code inside the index.html file

    Click the image to enlarge it. You can use 1 or 2 lines for your code – it doesn’t matter!

  3. Save the index file and close/reopen the file in Chrome.

Let me know if this helps! I like feedback 🙂


The Long Story

My Captivate 2019 project – a newly scalable, 1280 x 720, HTML5, SCORM 1.2, 60MB beast – worked perfectly! Uploaded to the LMS flawlessly! Played in IE! Played in FireFox! Played in Chrome! SVGs worked! Life was good.

Then, I tested it in a maximized Chrome browser on my 28″ monitor. The monitor has a max res of 3840 x 2160, but it was only set to 1920 x 1080. And then… alas.

My overlayed playbar just disappeared! Vanished! Both in the LMS and locally, they were gone on my big screen. I could hover over where the playbar should have been, and the tool tips would appear… there just weren’t any buttons to go with them! I didn’t notice at first, but my closed captions were also gone, too.

I enlisted my husband, who opened the inspection panel in Chrome (press F12 to toggle the inspector open/closed) to inspect the playbar element. When the panel opened, suddenly the playbar reappeared! When we closed the panel, the WBT got bigger, and the playbar and CC reappeared.

We learned that the playbar would disappear at any width wider than 1357px. By opening the inspector panel, the available space shrunk to under 1358px, so it “magically” appeared again. After further inspection, we were able to trace it to a CSS issue. Since it was only Chrome and only , I realized that this wasn’t a Captivate search, but a search in the web dev world. The first search on the list is the one that got me to where I needed to be.

Fixes:

I warned you this would be long!

At the top of the page is my recommended fix for the majority of users. It’s easy, and it’s precise. I wound up going with a different-but-similar solution in using a style on all div elements. The reason that I don’t recommend this option to most people is because divs are everywhere and apply to everything. I’m taking a risk that this stylesheet rule is benign enough not to wreak havoc on things. If you can shed more light on this, please let me know!

I wound up being able to fix this in the <style> tag of the index.html file.

Things I tried:

Option: Add code to your index.html file or index_scorm.html

(Note: this is the same as the TLDR at the top of the post).
This prevents both the playbar and the closed captions from disappearing, by adding a new css style for browsers that use the webkit calls (I added an FYI list of css support for many browsers at the bottom of this page). I found the div id for closed captions and added it to my code below, but it made me nervous that there may be some other object to which this could happen.

  1. Publish and unzip your project
  2. In your published project’s unzipped folder, open index_scorm.html or index.html in a text editor (Notepad) or web editor (Dreamweaver).
  3. Just before the </STYLE> tag, type the following:
    #playbar, #ccText {-webkit-backface-visibility: hidden;}
  4. Save the index file and then close/reopen the file in Chrome. If it doesn’t look like it’s working, make sure you’ve closed and opened the file before checking it out. A basic refresh (F5) will not update the file.

Option: In Skin Editor, uncheck Playbar Overlay. (option does not fix closed captions!)

This was the quickest solution, and it worked… but only for the playbar. It did not fix the closed captions. I also did not want the extra 36px of height at the bottom. If you are out of time, don’t use closed captioning, and can afford the extra space for the playbar, this will work for you. I was not thrilled with this answer, but I would have used this in a pinch.

Option: Add code to your index.html file or index_scorm.html

I used this option to get my playbar and closed captioning to appear in Chrome. This is almost the same as the last option, but changing div elements affect way more things. It worked 100% for me, and I think it could account for other unknown objects to which this same fix may be needed. HOWEVER, without knowing how you are uploading your file to the cloud, I cannot in good conscience recommend this for the masses. If you know your environment well, you can decide if you like this option.

    1. In your published project’s unzipped folder, open index_scorm.html in a text (Notepad) or web (Dreamweaver) editor.
    2. Just before the </STYLE> tag, type the following:
      div {-webkit-backface-visibility: hidden;}
    3. Save the index file and refresh/reopen the file in Chrome.

Option: Turn off HTML Scalability

Sure, this works, but I lose the ability to resize my web-based training training this way. I worked so hard to make things scalable! What’s the point of switching to SVG images if I can’t scale up? It’s painful to watch a tiny version of my training on my 28″ monitor, only to have the same training be slightly too large for my laptop. I don’t have time to change my resolution, so why would I expect this to be an answer to my users?

So, I do not recommend this… for my situation. If you use a lot of .jpg files that do not look nice at full-screen anyways, making not scalable could be the best answer for you, for now. After all, this set of problems didn’t start until I flipped the scalability switch!

Other things I tried that didn’t really work at all:

  • Resize your project larger. I can’t recommend this. Resizing is a pain (always backup!), and the playbar became too small to use. It also didn’t completely rid me of the problem.
  • Make the Playbar two rows. This did not work at all. It was not a fix.
  • Set the playbar’s alpha to 100%. This did not work at all. It was not a fix.

Special thanks to Dmitri Semenov, who posted:

http://help.dimsemenov.com/discussions/problems/858-weird-bug-in-chrome. I was able to take his solution for a similar issue and, with my husband’s expert help, to modify it for the Captivate playbar. I did not use -webkit-transform: translateZ(0); because it caused issues with my Captivate VR projects. Many, many thanks, Dmitri!

Nerd Stuff (Extra details provided by my husband. Thanks, Scott!):

Once the Chrome window’s display width gets to double the transform: matrix scaleY (last) value, the object flips backwards, making it invisible (see https://css-tricks.com/almanac/properties/b/backface-visibility/). The solution is preventing it from doing so by using -webkit-backface-visibility: hidden;.

FYI: Browser CSS Support:

Firefox and other Mozilla browsers (IceWeasel, etc) use Gecko. Internet Explorer uses Trident. Safari, Google Chrome and Konqueror use Webkit. Opera 9+ uses Presto. (https://stackoverflow.com/questions/1306269/webkit-css-support-which-browsers)

Which solution worked for you? Do you have a solution to add? Feel free to comment!

Working with Lines in PowerPoint: Group your lines to resize many lines at one time

There are some great keyboard/combo shortcuts that I use all the time when re-sizing or moving shapes in PowerPoint. For example, when I want to resize objects at the same time, I select the objects, and then I hold down my Control key while using the mouse to drag the object larger or smaller. If I hold the control and shift keys down while using my mouse to resize a picture on a PowerPoint slide, it will change the shape of images and shapes equally, from both sides of the picture.

Here’s the problem: When using Line Shape, you can’t make multiple lines longer at

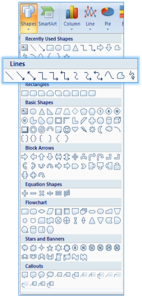
Find Shapes from the Insert ribbon.

Find Shapes from the Insert ribbon.

the same time by selecting multiple lines. Sure, you can select multiple lines at one, but if you try to resize them, you simply only resize one of them, not the bunch.

Lines are strange objects, and they do not follow all the same rules as other shape objects in PowerPoint. They have been working this way for a long, long time, and they still work this way in PowerPoint 2016

Here’s the solution: So… you can’t use the keyboard shortcuts on lines in PowerPoint…. but you can use the keyboard shortcuts when you group your lines!!!! To do this, simply:

  1. Select the lines you want to manipulate
  2. Group the lines (keyboard shortcut Ctrl+G)

About keyboard shortcuts: For those who do not know about keyboard shortcuts, please check out my blog post: Useful Keyboard Shortcuts in PowerPoint. These special keyboard shortcuts and keyboard/mouse combos will help you master drawing tools and shape manipulation in PowerPoint 2007 (also PowerPoint 2013). I can’t list all of them, but you can find a comprehensive list of keyboard shortcuts from Microsoft.com. I am only providing a couple of cool keyboard combos and shortcuts here.

Printing PowerPoint Handouts to PDF and Retaining Hyperlinks

I have to make a web and a print version of my PowerPoint presentations, which go into a student book. For the PowerPoint presentations, I prefer to use a 2-page handout format. This saves a lot of paper, and 2 slides per page is fine for classroom handouts. Since both the print and web versions are a .pdf file, I’d like to simply have one .pdf that is optimized differently for the different versions.

The Problem:
When I chose to Save as PDF, my .pdfs printed a black background on all of the .png images I used. I had to make 2 versions of my book with 2 different sets of settings. For last minute changes, now I’m changing at least three different files (the presentation, the web version, and the print version)!

Other things that I didn’t want or didn’t work:

  • Saving each slide as one page (I want the 2-page handout) offered solutions, but it doubled my print job
  • Printing to .pdf wont retain hyperlinks, so I needed to store/fix 2 different output versions of my presentations

The Reason:

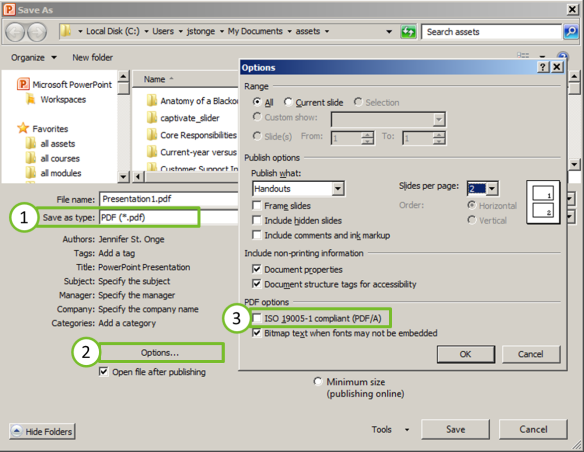
I finally discovered that the problem was arising only when I had “ISO 19005-1 compliant (PDF/A)” selected under the PDF Options. Deselecting that option causes the image to be displayed correctly.

It turns out that transparency in objects is not allowed in “ISO 19005-1 compliant (PDF/A)” formatted documents, so by setting it to be ISO compliant, it will automatically add a background color to images with transparencies.

Transparency is forbidden in “ISO 19005-1 compliant (PDF/A)” formatted documents, so the transparent portions of .png and .tif files are filled in. 

You can read about other restrictions of PDF/A files on its wiki page:  https://en.wikipedia.org/wiki/PDF/A

The Fix:
To fix, simply deselect the ISO 19005-1 option when saving your PowerPoint as a PDF. The .png images will display correctly. Here’s how:

  1. File > Save As PDF
  2. Click Options button
  3. In PDF Options (bottom), uncheck “ISO 19005-1 compliant (PDF/A)”

References:

I’ve been searching for this answer for years, and I finally found it on another answers.microsoft.com forum.

https://answers.microsoft.com/en-us/msoffice/forum/msoffice_powerpoint-msoffice_custom/png-lost-transparency-when-a-powerpoint-file-is/ca30823b-f21c-4697-af6e-a1513bbff97d

https://answers.microsoft.com/en-us/office/forum/office_2010-office_other/in-publisher-2010-save-as-pdf-causes-png-pictures/b1ca8dad-3776-e011-8dfc-68b599b31bf5?auth=1

Captivate 8 drag/drop caution: Event and Multi-slide Synchronized Videos have different properties

I recently took HTML5 Basics, a one-day virtual course taught by Joe Ganci. In his class, Joe demonstrated how to add a video to a project using the ribbon in Captivate 8. His video appeared on the slide, and he had player control options and other properties he could change on his video.

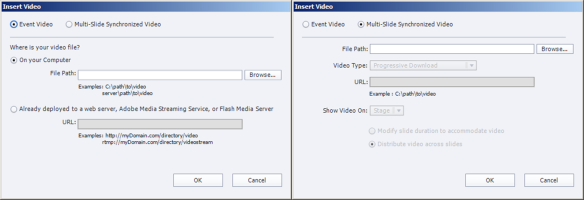
Event Video

Event Video with player controls

I repeated Joe’s steps, but since I am accustomed to importing to the library first, I imported (the same video Joe used) and dragged it onto the slide. It seemed like such a harmless deviation from his steps. I was wrong. My video did not have any controls on it. Where did they go? Both appeared in the Library. I was confused. Quickly, I backtracked and performed the exact steps Joe performed, and by inserting a video from the Media button on the ribbon worked (It is the same as Video > Insert Video or Ctrl+Alt+V). After the class, I dug around a bit to figure out what happened.

The Adobe help site has a simple write-up for the differences between an event video versus a multi-slide synchronized video, and it helped me understand what was happening. https://helpx.adobe.com/captivate/using/differences-event-synchronized-videos.html.

Here’s the long and short of what I learned:
DO NOT USE DRAG AND DROP TO INSERT VIDEOS FROM YOUR LIBRARY ONTO A CAPTIVATE 8 SLIDE. Sure, it will work for multi-slide synchronized videos, but it creates problems in the long run. I’ve even been able to crash Captivate using the drag & drop method.

Here are the two tried and true options to use. Do not bother importing your videos first! Even if you import your video into Captivate first, you must still choose the location of the video on your computer from these steps.

Option 1: Use the video menu or its keyboard shortcut

  1. Click Video > Insert Video. You can also press the keyboard shortcut Ctrl+Alt+V
  2. Select either the Event Video or Multi-Slide Synchronized Video radio button at the top.

Option 2: Use the Media button on the Ribbon     event versus multislide media button

  1. Click the Media button on the ribbon.
  2. Select Video from the drop-down options

Below are the options that you can set. The options provided in the Insert Video window will change depending on which radio button you select.
event versus multislide options


Are you not sure which option to use? Try using this chart to determine which type of video you need.event versus multislide


Now that you know which video type you need, here are links to Adobe help to get you started on the many options available.